| Page 2 |
|
|
|
|
|
|
|
|
Generally there are two ways to animate an image, redrawing each image as done in cartooning, or display a single image to different areas to simulate motion. Of course both these approaches can be combined, but we'll get into that a little later. Most of you should be somewhat familiar with the cartoon approach so I'll demonstrate moving a single image first. Here we have a little airplane, To see how this moving is done; Open GifCon, click on File. Click on Animation Wizard. Click Next. Use Yes, for use with a web page, click next. Loop indefinitely, Next. Use Matched to first palette. Next. Set the speed you would like the images to run. Your choices are in 100ths of a second. This can be changed later. I'll use 10/100ths here. This will make the animation one second long. Click Next. Your now ready to choose images to use in making your animation. Click Select, then browse to the image your using. In this example I'll be double clicking the little plane image ten times. I want the same image that often. When finished, I'll click on Cancel, sounds weird but that'll load them into GifCon. A new window will now show all the image names I've selected. Looks OK so I'll click Next. In the next window I'll just click Done and GifCon will remap all the images to use the same color palette as the first image. It's very important for all the images to be using the same set of colors. At this time the animation is completed to the point that it could be viewed, but we haven't as yet made the individual images display at different locations. At this screen you'll also see some other segments contained in a gif file.  Header, not too important. Loop, the command that replays the animation as often as you want. Control, holds information like image display speed, transparent color, and what should happen to this image when the next one is to be displayed. Double clicking on the names in GifCon will show these options. And finally Image. When you double click on image, a window opens where we'll set how we want this image to be displayed. The first image doesn't need to be moved, so we won't do anything with it. I'll double click on the second image line and there will be a window with several more options showing. At this time I'll just enter 20 in the Image Left box. Both these boxes are measuring in pixels from the top and left of a display area. GifCon will automatically make the final image size whatever it needs to be to contain how we've moved each image. This is a good time to use the Save as option so we don't lose what we've done. When you view the animation at this time you'll see that it plays each image, but doesn't erase the previous image. It looks like a train of little airplanes. I'll now show you how to make each image disappear after it's been shown. Click on the Manage button in GifCon, here you can set most of an animations options in all it's images at one time. Click on Select all, then choose Set all existing controls, click Apply. In the Remove by: box, set to Background. 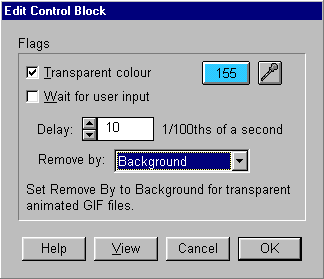 While we're here, we'll also choose the color that we would like to make transparent. In this animation the light blue background shouldn't be seen. To make the choice, place the check mark in Transparent colour box, then click on the eye dropper on the right. The first image in your animation will open in GifCon, use the eye dropper to click on the light blue background in the image. Click OK, then OK again in the next window and your done. Personally I don't like animations of vehicles that just appear, move, then disappear. I'd much rather see the image move into the frame a bit at a time, and exit the same way. Lets play with Paint Shop Pro a little bit and see if we can get the images we need to start and finish our animation. The first thing we'll need to do is open PSP, and the small
image we started with, the little plane. Next go up and click on
File, then click New. In the New image properties box enter the
size of our animation, 212 x 26. Click on the little airplane
window to show PSP we want to work there. Go up and click on Edit,
then on copy. We now have the little plane ready to paste into the
212 x 26 window. Click on the 212 x 26 so PSP will play there for
awhile. You might also use the magnifying lens We now need to capture both the front and back images for use
in our animation. To use the rectangle select tool, While we're here I would like to show you how to make a pause
in your animation without actually delaying one of your full
images. I'd like to make the little plane animation pause about 1
1/2 seconds between runs. To do this we need an image that will not
show, but can be used to set a 1 1/2 second delay. This "pause"
image will only be 1 pixel in size, and the same color as our
background was, light blue. Use File, New to make a new image 1 x
1. Click on either one of the other plane images to highlight the
title bar and then use the color selection eye dropper tool We'll now return to GifCon and insert our three new images into our animation. To insert the nose of the plane in the beginning of our work we first highlight whatever is just above where we want to put the image. In this example we'll highlight LOOP. Press the Insert button, then the Image button, find and double click the image name you want to insert. In this case, Image1.gif. When you pick the file name you'll be presented an option to get a color palette for this image. Use Remap this image to the global palette. We don't want any images using their own colors, all images need to use the same one, the Global palette. Every image also needs a control block, so again, highlight LOOP, then Insert, Control. Double click the control block, set all the controls to match the others in this animation, delay 10, Transparent colour, and Remove by background. We don't need to move this image, it's fine all the way to the left. Next we'll follow this same sequence to insert the image Pause.gif. When you try to set the transparent colour in this control , the image is so small you won't be able to use the eye dropper. Double click on the white box next to the eye dropper, the one with the 0 in it. A color chart will open where you can click till you find the right color, in this example, color 155. Set the Remove by background again, but when your setting the delay, use 150 instead of 10. This will show/delay the 1 x 1 pixel Pause.gif for 1 1/2 seconds. Finally the tail of the plane should be inserted. Go all the way to the bottom of the file list, just above Block Names in GifCon and highlight the last image. Use insert to set a control, highlight it, then use insert again to set in image2.gif. The controls for this image will need to be the same as all the others. Double click on the last image to bring up the window that allows you to move the last image over 200. As you may have noticed, this animation is a little jerky. The best way to combat jerkiness is by using more images and shorter delay times. File sizes, load times, can get way too big in a hurry though. It's always a compromise worth considering though. On a final note here, if you would like to include your name,
E-mail address, web site URL or other information in your file,
insert a comment from the drop down menu. Some un-registered
shareware programs won't allow you to change the text in comment
blocks till the program is paid for. |
|
|
|
|
|
|
|
|