Spiral staircase plans for wood.
If you can find better spiral stair plans, I'll buy them for you. |
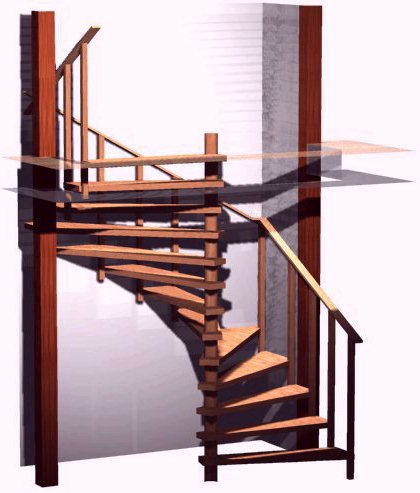
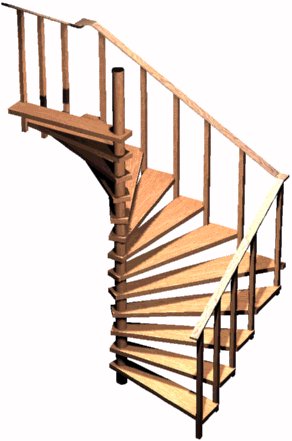
Spiral stair Site noteThese staircases are constructed on a three inch (internal diameter) steel pipe. The treads have a 3 5/8th inch hole in them allowing them to slip fit over the pipe. Between each tread there are short pieces of three and one half inch (internal diameter) pipe which are also slipped over the center pole pipe. After the landing is placed on top of the staircase, a threaded pipe is screwed onto the center pole pipe which tightens everything in place. These spiral stair plans go into detail about how to measure, construct, then assemble this spiral staircase into several different situations. Among other features in the plans, I've included instructions on veneering the spacer pipes with real wood, and laminating a continuous wood handrail. The handrail is built flat using a dozen wood slats each being 1/4 by 3/4. The railing is actually pulled into a helix while it's being installed. |
Spiral stair Site map |
|
|
|
|
Plans built spiral stair pages[ 1 ]--- [ 2 ]--- [ 3 ]--- [ 4 ]--- [ 5 ]--- [ 6 ]--- [ 7 ]--- [ 8 ] |
|
|
|
|
|
|
|
|
|
|
|
|
|
|
| [Weird spirals] Out of the ordinary. |
| [Winding spiral] Something new for me. |
| [Rectangular spiral] A style I've been developing. |
| [Dome spirals] Two spirals in the same building. |
| [Stacked spirals] One atop the other. |
| [Stair consultation] Stair design and fabrication. |
|
|
|
Sooner or later I'll be building a rectangled spiral for a customer here in Michigan. If you would like
to see a computer generated model of the proposed spiral staircase, click any of the three links below.
|
|
These plans nor portions thereof may not be reproduced in any form or by any means without written
permission of the original author and/or the publisher. A portion of the spiral stair plansBefore you begin cutting wood, I'd suggest you look closely at a spiral staircase near you. Try to
visualize how the stair will be effected by the design of the various components, tread width, step height,
and headroom should all be equally considered. When you enter a spiral staircase you'll revolve about a full circle and be directly above or below your starting point. If you're building your staircase from the edge of a loft, or through a floor opening, exit and entry shouldn't be a problem. However, if you're planning a corner installation, or against a wall, pay particular attention to direction of rotation and exiting problems that may develop. If the bottom tread is in a corner you may not be able to walk out from under the staircase without ducking your head. ( FIG 1 ). All spiral staircases rotate as they climb. The amount of rotation is determined by tread number and width. If the staircase rotates too slowly (narrow treads) it will not have sufficient step area for safe walking. You would be making something resembling a twisted ladder, which may be impossible to descend safely. When the staircase treads are too wide, it will rotate so quickly that it's returned under itself limiting your headroom. When the top landing is too wide it will also limit headroom under the landing. This staircase will rotate approximately 360 degrees, in a height of about nine feet. The landing should be about two and one half times a tread width. Under most circumstances these approximations will be a compromise between the ideal and the possible. Measuring for your staircase requirements does not involve more than finding it's height, and the desired diameter, (distance across). The height should be measured hard floor to hard floor, ignoring the carpeting. The diameter should be as large as possible. A larger diameter staircase will make longer and wider stair treads without increasing the rate of rotation. ( FIG 2 ). Your diameter should allow a clearance of walls and floor openings by at least two inches for finger clearance on the handrail. Since five feet ( 60" ) is a popular diameter, let's calculate a practice set of numbers for a hypothetical staircase. Let's use a height of 107" floor to floor, and determine how a number of steps (treads) will effect our tread height (rise). If we divide 107" by 13, 14, 15, or 16 treads we'll notice various rise possibilities. Thirteen treads would make a rise of 8.23 inches each, fourteen treads would be 7.64, fifteen is 7.13, and sixteen would be 6.68 inches each. At first glance you may think sixteen treads, with a rise each of 6.68 inches would make an easy climbing staircase, however a normal width of tread would rotate the stairs so quickly that a headroom problem will occur under the landing. Yes, you could make narrower treads, but there are better compromises we can make instead. To determine our actual distance around the staircase, we'll multiply our diameter, 60" by pi, which is 3.14. This will give us a distance around the staircase (circumference) of 188.4 inches. Dividing 188.4 inches by our sixteen treads indicates that our treads would be 11.77 inches in width, ( run ). This dimension is on the outside end of the treads, not in where you'll be stepping. When you look down a spiral staircase, near the center pole, you'll notice there is no usable tread width near the center pole. If the treads were 11.77 inches on the large end, and almost zero on the narrow end, it's obvious that we won't have enough room to walk on the treads. To look for alternatives we would divide our circumference, 188.4 inches, by 13, 14, and 15 rises. Thirteen rises would equal 14.49 inches in tread width, 14 equals 13.45 inches, and 15 would have 12.56 inches. Thirteen rises would make a tread almost 14 and a half inches wide. This sounds better, but let's look back at the rise each of the thirteen treads would have. As seen before, thirteen rises in the staircase worked out to 8.23 inches each. You would have a very wide place to step, but you would also have an excessively high rise. Although some building codes allow up to nine inches of rise, I've found that you should try to be in the range of seven and one half inches of rise. Fourteen treads would have a rise of 7.64 inches, and a tread width of 13.45 inches. Fifteen treads would have a rise 7.13 inches and a tread width of 12.56 inches. In this example I would recommend building the fourteen rise staircase, it's a compromise between an excessive rise, and too narrow or too wide of treads. As further example, if this staircase were six inches larger in diameter, 66", the circumference would be 207.24 inches. The treads that were 13.45 inches wide would then become 14.8 inches wide. This increase in tread width would not involve more rotation of the staircase, but it would allow you wider passage, and more foot room for very little more materials. ( FIG 2 ). As with any staircase a sufficient area to step is of utmost importance. If it's at all possible to increase the diameter of your staircase, don't hesitate. Intentionally blank. Balusters. A spiral staircase is very versatile, it can be made with more than a full revolution, add the appropriate number of runs, then consider the rises accumulated to determine your headroom under the landing. This staircase can also be made with less than a full revolution, however tread width will usually be sacrificed. These staircases can be joined vertically with a landing at the midpoint to accommodate a tri-level arrangement. Intentionally blank. Wood choices. The length of the tread blanks will be determined by the radius (half the diameter) of the staircase and adding six inches. The required extra six inches will allow for extending over the center pole, and trimming of both ends of the tread. As you should notice in ( FIG 3 ) you'll be constructing treads in pairs of two or four. You'll have considerably less waste using this method. The widths of these tread blanks are determined by adding the wider end of a treads width to the narrower ends width. The narrow end of a tread is most often six and one half inches, ( 6 1/2" ). Adding this 6 1/2" to a hypothetical tread width of thirteen inches would yield a tread blank pair of nineteen and one half inches, ( 19 1/2" ). The six and one half inch, ( 6 1/2" ) dimension is not critical and will not significantly change stepping room on the tread. In this example your tread blanks could be made twenty inches wide, and yield a pair of treads. Blanks forty inches ( 40" ) wide would yield four treads each. Don't make a tread for every rise, the top tread is actually the landing and will be constructed differently. Make one less tread than your total number of rises. Thirteen treads, and a landing, each having a rise of 7.64 inches will make this staircase 107" tall. When you begin cutting wood for the stair tread blanks, cut all the stock for the blanks so they are not more than about four inches ( 4" ) wide, wider boards will be more likely to cup or curl. It's probable you'll be using six, eight, or even more pieces of wood to make twenty inch ( 20" ) wide blanks. Determine which side of your pieces of wood were the outside of the tree. During assembly alternate the end grains, the trees outside up, then down, up and so on, ( FIG. 4 ). This procedure is necessary to help stabilize the wood treads during humid or dry weather cycles. It's not necessary to exactly flush the ends on the tread blanks. You should be planning a cut off of about an inch on both ends of the treads. Before gluing the pieces together, plane or joint the edges to remove saw marks, and any irregularities to insure a square and true glue surface. Use one of the yellow carpenters glues, Titebond, Wilhold, or an epoxy. Pipe clamps work well, put them on opposing sides of the blanks so they will be less likely to curl after tightening. Don't over tighten the clamps and force all the glue from the joints. Wipe off the excess glue with a damp sponge. Set the tread blanks aside for a day or so to dry. You'll need to make a paper pattern for your treads using the widest end dimension and six and one half inches, ( 6 1/2" ) for the narrow end. Use a paper as long as your tread blanks. Fold the paper pattern in half lengthwise, then unfold and you'll have a treads center line folded onto the pattern, ( FIG. 5, fold #1 ). On the narrow end of the pattern, perpendicular to the center line, fold what will be the patterns narrow end, aligning the center fold #1 on it's self. This fold will square the narrow end of the tread with the center line fold, ( FIG. 5, fold #2 ). Measure out from the center line, along fold #2 in each direction from the center line, three and one quarter inches, ( 3 1/4" ) and put marks. This will make the pattern six and one half inches wide on the narrow end. On the paper pattern place a mark on the center line #1 fold, four inches, ( 4" ) from the narrow, folded end of the pattern. This is the location for a three and five eighths inch hole in the tread. Measure from the center of the holes location toward the larger end of the pattern and place a mark that is your stairs radius. In our example this dimension would be thirty inches, ( 30" ). This paper pattern will show the very minimum length that the tread blanks need to be. At the thirty inch mark you should fold and measure out from the center as we did on the small end, except this time use your treads wider end measurement to establish the width. Refer to ( FIG. 5 ) and use a straight edge to connect the four corners of the tread on the pattern. When using the pattern to mark on the tread blanks leave most of the waste cutoff on the larger end of the tread. After the treads have been cut out of the blanks they should be planed, or belt sanded to as exactly as possible the same thickness'. Belt sand, or joint the edges and narrow end of one tread. Using this tread for reference, make all the remaining treads the same as the first reference tread, duplicate it as closely as possible, especially the width at the wider end. From the paper pattern, transfer the 3 and five eighths of an inch ( 3 5/8" ) hole location onto the treads. The hole should be centered at four inches, ( 4" ) from the narrow end of the tread. This hole should be slightly larger than the three and one half inch, ( 3 1/2") center pole. There are several ways to make a hole this size. The surest method would use a hole saw in a drill press, however as an alternative a jig saw could be used. A little imprecision can be tolerated here as the balusters will align the treads before the staircase is tightened. Before making these holes, measure from the center point to be certain the tread will have sufficient length for trimming the radius on the wider end of the tread. A precise radius cutting method uses a band saw and one of the hole scraps mounted out in front of the saw, ( FIG. 6 ). Be sure the center of your scrap circle is mounted exactly your radius away from the band saw blade. It's also very important that the center of the wood circle be exactly perpendicular to the blades teeth. If not, the cut will travel off your radius. You should also support the narrow end of the tread as your swinging the tread through the saw. This is best done by mounting the wood circle flush with the saws table. The radius cutting on the widest end of the treads could also be done using a jig saw. A multi-purpose tool for establishing a radius line is easy to make, and has another purpose you will use it for later. To make this tool, fasten a one inch, ( 1" ) wide stick to a three and one half inch, ( 3 1/2" ) wood circle. The stick should be exactly one inch, ( 1" ) wide, and fastened over the center of the wood circle, ( FIG. 7 ). This stick should also be a little longer than the tread when it's wood circle is placed in the hole in the tread. From the center of the wood circle, measure along the stick and mark your radius dimension on the edge of the stick. Putting this marking tool in a treads hole allows swinging it across the tread. Hold a pencil to the line on the edge of your stick and create your radius line, ( FIG. 7 ) This stick will also be used to mark the baluster notches on the ends of the treads. Vertically, the baluster notch faces will be one inch, ( 1" ) apart when the staircase is assembled., ( FIG. 8 ), hence the necessity to make the stick exactly one inch ( 1" ) wide. The landing should be planned to determine how it will mount to your floor, or loft edge. The strongest method would be notching the flooring and into a floor joist the thickness of your landing. The widest landings use six, number 14, by two and one half inch, ( 2 1/2" ) wood screws to fasten the landing down into the notched floor joist. Bore one half inch, ( 1/2" ) holes in the landing for the screw heads to countersink into. Finish the holes with one half inch ( 1/2" ) flush wood plugs in the holes. ( FIG. 12 ). The length of the landing will be your staircase radius, plus the additional length, and shape, required to reach a solid mounting area. Handrail finger clearance should also be a consideration. If the staircase is against a wall under the landing, be certain to make the landing long enough to keep the handrail about two inches from the wall. The shape of the landing is identical to a treads narrow end, front edge, and baluster notch location. The center pole hole is also positioned the same as a tread. The wider end of the landing should be about two and one half, 2 1/2 times as wide as a tread. ( FIG. 13 ). The landing can be altered with different shapes. As an example, the landings shape can be used to move the bottom tread around to a better location. ( FIG. 14 ). Regardless of the landings widest end shape, the narrow end, hole, front edge, and baluster notch should all be traced from a tread onto the landing. The widest end of the landing should not be narrower than the distance between the center pole and the baluster of a tread. Building the landing should use some of your leftover wood. ( FIG. 15 ). After cutting the landing and sawing it's hole, wait to router it's edges. There will be balusters mounting along the landings back edge that should be allowed for. Temporarily mount the landing in your staircases location. Use a "dead man" pole to hold up the narrow end of the tread. Hang a plumb bob down through the center of the landings center pole hole, and mark it's location on the lower floor. Using one half inch, ( 1/2" ) wood, make a circle three and one half inches in diameter. Mount this circle on the floor where the plumb bob indicated the stair base should be. This circle will restrain any side to side movement of the staircase. The weight of the staircase will also be resting at this location, be certain this area will support several hundreds of pounds. If you doubt the structural integrity of this area, add solid wood blocking, or bridging, between the floor joists. The staircase should be solidly supported. The spacers between the treads on the center pole are three and one half inch, ( 3 1/2" ) pipe. A spacer and a tread should equal your rise. To determine the spacers lengths, stack all the treads, and the landing, and measure the stack. In the example staircase the tread stack measures twenty four and one half inches, ( 24 1/2"). The example staircase was to be one hundred and seven inches, ( 107" ) high. Subtract the stacked treads height, from the total height of the staircase, 107" minus 24 1/2" equals 82 and 1/2" in this case. Divide this number, 82 and 1/2", by the number of rises in the staircase, fourteen in this example. This division results in spacers needing to be 5.89" long. A spacer, 5.89" plus a tread 1.75" = 7.64" damn near what we needed. When you purchase the pipe for the spacers, have it cut to your required lengths, I'm sure they will vary in length slightly, but in this example, stacked, the spacers must measure 82.5" high. The center pole is a piece of three inch ( 3" ) pipe with threads on the uppermost end. This poles length will be the same as your floor to floor height, ( 107" ) in this example staircase. Occasionally pipe with threads will be unavailable, but it's possible to weld half of a three inch, ( 3" ) pipe nipple onto the center pole. Half, or more of a 10 or 12" nipple will be long enough to clamp into an angle iron for tack welding to the center pole. The angle iron will help with alignment before finish welding the joint. I use radiator hose clamps to clamp the angle iron to the center pole, then also clamp the half nipple into the angle iron. Grind the weld flush so the spacers and treads will slip over the center pole. When you purchase the three and one half inch pipe for the spacers, be certain it will slip over the three inch center pole pipe. Sometimes iron pipe has a weld seam inside that makes it difficult to use without grinding down the internal weld seam. The spacers should be able to rotate on the center pole easily. A rotary sanding drum in a drill will remove enough of a weld seam to work if you can't get pipe without a high seam. Galvanized pipe may also be a problem. Again, the center pole should be the same length as your floor to floor height. The first, bottom, spacer is to be welded to the center pole. This first spacer pipe should over hang the unthreaded end of the center pole by three quarters of an inch, ( 3/4" ). Do all the welding to the center pole inside the spacer. ( FIG. 16 ). The over hanging spacer will allow the threaded end of the center pole to protrude through the landing three quarters of an inch, ( 3/4" ). A top post pipe, (for the landing) is constructed in such a way that it can be used to tighten the staircase after assembly. The top post is a three inch ( 3" internal diameter) pipe coupling welded to a three and one half inch, ( 3 1/2" inside diameter) pipe. The total length of this top post should be thirty five and one quarter of an inch, ( 35 1/4" ), three quarters of an inch ( 3/4" ) shorter than the finished landing hand rail height of thirty six inches ( 36" ). Aligning the coupling to the top post for welding is accomplished by first sliding the top post over the threaded end of the center pole, then thread on the coupling, ( FIG. 17 ). The coupling is a little short to clamp into angle iron for welding, it may not be straight enough. Some couplings do not have exactly three and one half inch outside diameters, make sure yours is, or the weld can't be ground flush with both the coupling and the top post. It may be that you'll need a conduit coupling, or a high pressure type rather than a regular three inch coupling. The top post needs a lag screw, two and one half inches by five sixteenths of an inch, ( 2 1/2" X 5/16" ) welded into the top, unthreaded end of the landing post. About three eighths of an inch, ( 3/8" ) down in the top post, weld a piece of one inch wide, ( 1" ) steel across, inside the post, 1/8th to 1/4 inch thick would be fine ( FIG. 18 ). The lag screw will weld to the one inch wide piece of steel after it's welded into the post. The lag screw should be centered, and protrude two and one eighth of an inch, ( 2 1/8" ) out the top of the post. This screw will mount the landing handrail, and top cap. A tool that will tighten the top post can be made with a flat steel bar about two feet long, and two short pieces of angle iron. Weld the angle iron on to the steel bar as shown in ( Fig 18 ), and drill a hole through the bar that will slip over the lag screw. The downward tabs that the angle iron forms should not be so wide that they will not fit inside the end of the top post. Also pictured is an alternative method of tightening the top post. Have someone hold two lengths of pipe, or steel rods down into the top of the top post and use a third length to place between the two vertical pieces for tightening. The landing should be level at this time, if not, further adjusting is possible. If the narrow end of the landing is low, make a spacer pad that raises the staircase off the floor the necessary amount. ( FIG. 20 ). If the landing is too high on the narrow end, cut some off the spacer pipe that is on the floor. If there's too little threads showing above the landing, router under the first tread, above the first spacer, then raise the staircase an equal amount by lengthening the first spacer pipe, or setting the staircase on a spacer pad. If the landing is level, and there are too many threads above the landing so that the post can't be tightened. Cut a sufficient amount off the bottom of the welded spacer, and relocate the cut off piece to the top of the welded spacer. ( FIG. 21 ). Don't fully tighten the top post until final assembly. This trial fit assembling could also be done horizontally on saw horses.  [FIG. 30] [FIG. 31] [FIG. 32] [FIG. 33] [FIG. 34] [FIG. 35] [FIG. 36] I don't doubt some of you could build a laminated handrail without purchasing the plans, but how much would you actually save if it didn't fit on the first try? I've even heard of people building handrails in place, but it's a real time consumer. You might even devise an easier way to build a handrail. However, following these directions, a handrail shouldn't take much more than a day to complete. When a router is used to round the edges on the handrail, proceed very slowly, the outside slat is prone to flaking because it is under tension. You might even consider moving the router in the normally backwards direction for the first pass. The handrails installation is completed with the insertion of three eighths inch, ( 3/8" ), oval or flush head wood plugs in the mounting screw holes, ( FIG. 36 ). The handrail for the landing is made by tracing the landings back edge, narrow end, and the hole for the center pole onto a paper. You will use these traced edge lines to make a pattern for the three inch , ( 3" ), wide, three quarters of an inch ( 3/4" ) thick handrail. To center the handrail over the balusters, the handrail pattern should overhang off the back edge of the landing by two inches, ( 2" ), and be parallel with the back edge of the landing. This will make the pattern overlap on top of the landings back edge by one inch, ( 1" ), and be centering over the balusters. The end of the handrail that fits over the top pole screw should be a five inch, ( 5" ) circle, centered on the screw. The five inch, ( 5" ), wide hand rail section between the circle and the straight three inch wide handrail should duplicate the angle on the narrow end of the landing. ( FIG. 38 ). Drill a three eighths inch, ( 3/8"), hole in the handrail at the center of the five inch circle. This hole will locate the handrail over the screw on the top pole. Trace a can, or use a compass to make a curve that will join the straight three inch wide section of handrail to the five inch wide section. The landing handrails free end should be planned to mount securely to an existing handrail, wall, or other structure. For a handrail blank, use a three inch, ( 3" ) wide by three quarters of an inch ( 3/4" ) thick board with short pieces glued to the side of one end that the five inch circle can be cut from. Along the back edge of the landing, evenly space the balusters locations. Use a number of balusters and spacing that goes well with the baluster spacing elsewhere on the staircase. Usually, local codes set a maximum spacing between balusters of four or six inches. The dado in the balusters should use the same notch depth, and location as used on the staircase balusters. DON'T cut a dados into the back edge of the landing. The balusters lengths above the dado should match the height of the center post, thirty five and one quarter inches, ( 35 1/4" ). After marking the balusters locations on the landing, transfer the locations onto the handrail blank. To transfer the baluster location marks from the landing to the handrail, place the handrail on the landing, making certain the handrails 3/8" hole is centered over the center poles hole in the landing. The handrail should also be overlapped onto the back edge of the landing by one inch, ( 1" ). The handrail and top post are finished capped with a four inch, ( 4" ) circle, one and three quarters of an inch, ( 1 3/4") thick wood cap. Pre drill the cap so it will screw down onto the 5/16" lag screw in the center post. The landing handrail should be fastened in the same manner as the handrail on the staircase, 3/8" counter bore, using 1 5/8" all purpose screws. Pre drill the back of the landing for the balusters mounting screws. After marking where the balusters will be mounted, use a router to round the edges of the landing, except where the balusters will be mounted. The spacer pipes have several optional finishing techniques. Painting would perhaps be the simplest, but brass or chrome plating can be spectacular. The spacers can also be wrapped with a real wood veneer, and can be finished to match the staircase. Using veneered spacers will also give the staircase the appearance that it's assembled on a four inch wood dowel, without any visible means of attachment for the treads. It won't be important what width veneer you can acquire, the veneer will be cut and reassembled. The veneer will need to be cut lengthwise about one inch, ( 1" ) longer than your spacer pipes, and edge joined to thirteen inches, ( 13" ), wide. The straight grained edges are stacked, and then clamped between two wood sticks. ( FIG. 39 ). Clamping between two sticks will make it possible to plane or belt sand all the veneers edges straight for assembly. Temporarily use masking tape to join all the veneers straight grained edges to form a long strip of veneer. When joining, try to match the color and grain patterns of the veneer. The masking tape is on the finished side of the veneer. ( FIG. 39 ). Across this long veneer, place a piece of masking tape every thirteen inches, ( 13" ). Cut the veneer in the middle of the thirteen inch tapes using a straight edge and a razor knife. The tape will help to make a cleaner cut, then these can be removed. ( FIG. 40 ). These Thirteen inch pieces equal the circumference of the spacers, plus a little. Also assemble a veneer that is thirteen inches, ( 13" ) wide and at least thirty six and one half inches, ( 36 1/2" ) long. This piece of veneer will be used on the top center post. If you can't get the spacers sandblasted, at least wash them in hot soapy water and scratch them with rough sandpaper. For the contact cement to work best it's very important that the spacers are clean and abraded. Some pipe has a coating that may need scuffing with coarse sandpaper to insure maximum adhesion. Use contact cement to coat the spacers, and the side of the veneer without the masking tape. Contact cement works very well, but be sure to use two coats. Allow much time for the first coat to dry so that the second coat will not loosen the first coat. Lay the veneer in front of the spacer, roll the spacer onto the veneer while pressing down on the spacer. ( FIG. 41 ). Remove the masking tape and rub the veneer onto the spacer with a stick so that good contact is made. The lap joint is sanded off as the joint is worked down into flush, creating a butt joint. Quite often it's very difficult to find all the joints that have been made. Cut the excess veneer off the ends of the spacers with a razor knife, if you use a shearing motion it will minimize splintering. As the staircase is assembled, line up the grain and color of the spacers as carefully as you can and the staircase will appear as though it's assembled on a four inch wood dowel. Staircases in your area may be required by building codes to have intermediate balusters installed. Their function is to decrease the distance between balusters to four, or possibly as much as six inches. Intermediate, and primary balusters should be equidistant from the center pole. To determine the length of a single intermediary baluster, add half your treads rise to the length from the dado to the high side of the angle cut on a primary baluster. ( FIG. 42 ). In the example staircase we were using a rise of 7.64 inches, half that would be 3.82 inches. The measurement from the dado to the top of the angle cut on a baluster is 35 1/4", added to half the rise, 3.82", giving a intermediate baluster length of 39.07". I hope it's obvious that these balusters won't be getting a dado, they are on the tread the same distance from the center pole as the primary balusters. If you need to place two intermediate balusters between primary balusters, add one third the rise for the shorter balusters, and two thirds the rise for the longer balusters. Using one third, and two thirds, will put two balusters on the tread between the primary balusters. You will also need to place additional mounting holes in the handrail, either half way between the existing holes, or one third the distance between the holes, depending upon how many intermediate balusters your using. The treads are counter bored up into the bottom for mounting of the intermediate balusters. The balusters should be equally separated and fastened with the same type and size screws as the primary balusters. Another option that may be considered is to inlay the treads with carpet. Inlaying will involve routing into the treads an area that the carpet can be fastened down into. It will look best to have the carpet inlay extend down over the front edge of the treads about two thirds of the treads thickness. Begin by drawing the area to be routed on a tread. Use the center of the pole hole to draw a radius about four inches from the wider end of the tread, and another radius about four inches from the center pole hole on the narrow end of the tread. The back edge of the route area can be left about a treads thickness wide from the back edge of the tread. To make a jig for the router to work in, start with a thin piece of plywood about a foot larger than a tread. You will be fastening this plywood up on blocks so that the treads can be slipped in and out from under the plywood from the larger end, and be contained by blocks so that the tread will stay positioned in the jig. Mount the jig so the treads front edge will be flush with the edge of the work table. Cut the jig plywood a little ways back from the drawn lines on the tread, it's just necessary to see the lines on the tread at this point. Set a compass to the dimension that your router will be cutting from the edge of the router base to the cutting edge of the router bit. ( FIG. 43 ) Insert the tread in the jig and use the compass to transfer the lines off the tread and over onto the jig. ( FIG. 43 ). Cut the jig plywood on this newly created line and the router will be contained in the jig, and over the tread during routing. Make a front for the jig in a similar manner as that used for the top. ( FIG. 44 ). Make the routing not quite as deep as the carpet is thick, and it will tend to hide the routed edge. I'd suggest not using carpet padding on the treads. To route the landing, rearrange the rear jig blocks so the landing will fit in the jig. Do the routing on the front edge and top of the tread. Release the jig so it can pivot at the center pole hole, and continue routing and pivoting until the back edge is completed. To make the carpet on the landing join flush with the carpet on the upper floor, plan for the first (welded) spacer to be longer than originally thought. How much longer is dependent upon the depth of the carpet routing. If the carpet routing was perhaps three eighths of an inch deep, the spacer pipe should be three eighths of an inch longer.. This lengthening will have the effect of raising the whole staircase the thickness of the carpet routing. An equally effective alternative to the longer spacer is to place a wood circle spacer pad of the proper thickness under the first spacer before setting up the staircase. If the lower floor the staircase is sitting on is also carpeted, either of these height changes will make all the rises equal. Normally, if not allowed for, the first rise off a carpeted floor will have less of a rise because of the carpets thickness. While making the handrail, you can disassemble the staircase, treat the spacers, and finish the treads and balusters. After the staircase is finished assembling, put wood buttons in the baluster mounting holes, and oval head wood plugs in the handrails holes. Oval head plugs can look the finest, but they can be sanded flush and varnished after the staircase is installed, if you don't mind finishing the top of the handrail in place. Paste wax the whole staircase occasionally, but never wax the tops of the treads. You can change the measurements of something like the balusters, but be careful in that many other measurements will also be effected by changes. For the colonial look, the balusters could be turned on a lathe, don't decrease the bearing for the handrail though. If you don't route for carpeting, the staircase can be assembled with a left or right rotation. The landing handrail is the only part that wouldn't be reversible, only because the counter bore mounting holes would be upside down. If your staircase will be about six feet in diameter, or larger, You might consider filling the center pole with concrete. Even though the stair is strong, concrete will make the stair feel even stiffer. Although I can help, it's your responsibility to confirm that this staircase will be built within your local building codes restrictions. I've yet to see any spiral staircase code restrictions that couldn't be met. |
 |
Visit the remainder of this site. Aviation Animation. |
|
|
|